Friday, February 26, 2010

February 26th - Finished Piece, Using Portraits from Haiti, for the Women's Art Show


Well, I have always been able to work best with a deadline. I tend to wander off to other projects if I have all the time in the world. So, just in the nick of time, I finished my piece for the Women's Art Show at the Banff Public Library. I worked on it for about a week. I am really happy with how it turned out. I start with a basic plan but am not really one to lay out a project before beginning. I tend to have the best results when I just jump in. I know that seems strange but the minute I get hung up on something being perfectly straight or perfectly anything, it goes awry. This all went so well I am thrilled. You can see yesterday's post for the progression of this piece. Here are the photos of the finally step and the finished piece. It will be on display at the Banff Public Library for the month of March. All proceeds in the sale of this piece will go to His Hands for Haiti to build a home for orphaned and abandoned children.


Thursday, February 25, 2010

February 24th & 25th - Women's Art Show Piece, Using Portraits from Haiti


(The beginning of my piece; I selected images from my negatives, had them printed, arranged them, added fabric hearts and collaged text from a vintage dictionary.)

Usually when I drop off the face of my blog for a few days it is because I have been busy creating (and I am probably under a deadline). My post to Thing-A-Day for February 23rd was the tutorial below, although I posted about the making of the project on the 22nd. And my last two posts to TAD have been about the piece I have been making for the Banff Public Library's Women's Art Show. I have been in this inspiring show with my fellow creative Banff sistas, for the past three years. I have been working on this mixed media piece for about a week, here and there.The show corresponds with International Women's Day on March 8th. There is always a theme but artists do not have to work within it. This year it is "Equal rights, equal opportunities: progress for all". I would have to say that I didn't work within the theme, at least not only in a women's rights sense. I chose to do my piece on Haiti. I have been there twice. I used images I shot for a child sponsorship program and collaged on them with text and fabric. I used both male and female images that I embroidered together. The next post will be the finished piece.


(I hand embroidered the photographs together using a variety of stitches)


(Once I had them all emboidered to one another I laid them onto handmade paper. The final steps will be in the next post).

Monday, February 22, 2010

February 22nd - Zippered Pouch


(This pouch by Sheila Snowsell, my instructor)
I have taken many sewing classes but I think I am finally getting more confident. This week I learned how to sew a zipper with my machine. It was pretty exciting since I have never even had the zipper foot out of the package it came in. I made this cute little pouch. I messed up on sewing the corners inside the pouch (I sewed across too low on one side) but my 3 year old thinks it is perfect and since I made it for her, that is all that matters. She asked me if I told the people in my class that I was making this for my little girl and she found it extra special when I answered, "Yes". She was giddy and ran to show Daddy.

You can make one of these, too. You will need a small piece of fabric and a 7" zipper.

How to Make a Zippered Pouch (in less than two hours)
By Tiffany Teske


1. Cut a piece of fabric 12 3/8" by 8 1/2". This project uses a 1/4" seam allowance. I used a cotton print. Another person in my class used a tapestry fabric.
2. Cut a piece of interfacing the same size. Iron on to the wrong side (back side) of fabric.


3. Fold the fabric in half, interfacing size out. Sew the two sides together at the top right hand corner, front & back stitching, for about an inch, using a 1/4" seam allowance.


4. Fold back the two edges, to the stitching, and all the way down, then iron open. Remember not to iron on the exposed interfacing.


5. With the stitched part at the bottom, line the zipper up with the top of the open fabric and pin the fabric close to the edges of the zipper teeth.


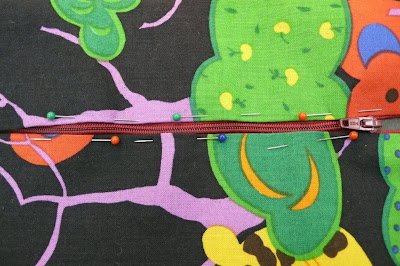
Pin the other side the same way.


6. Using your zipper foot, sew very close to the edge of your fabric, beside the zipper. Be careful not to hit the actual zipper teeth, that is too close ;) It gets a bit tricky when you get to the bottom of the zipper but just stitch straight across the bottom and back up the other side, taking care not to stitch anything together that you shouldn't have.


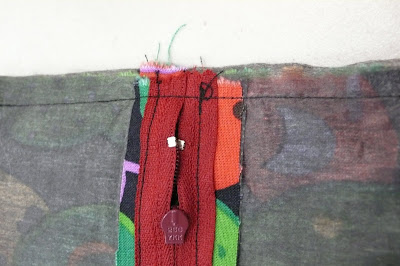
7. Now you should have a open ended tube with a zipper in it. As you can see, my straight lines along my zipper are a bit wonky when I am not being guided by my regular foot. Whoops! Compare with the first photo in this post of the pouch made by my teacher...


8. To make a strap, cut it to the length and width you want, fold in two, wrong sides together, and sew a straight stitch up the edge. Turn the tube right side out.


9. Straight stitch up the edges of your large pouch tube, laying your small handle tube inside, flat, so your stitching will go over the edges of the handle, securing it while closing the entire end. (I think this is confusing when I put it into words... I apologize for not getting a photo of this step...). The two photos above are of the same step. You should now have a closed tube.


10. Holding the corners, flatten the into triangles and sew across the triangle about 1" down. This makes your pouch square instead of flat. This is where my pouch got wonky because I sewed across by sight and measuring each side against the other, instead of measuring, marking, pinning, then sewing. Take care with this step. Do it to all four corners. Now you are done!


11. Turn your pouch inside out and ta-da!

Sunday, February 21, 2010

February 21st - Chocolate Peanut Butter Brownies TO DIE FOR


I will forever be grateful to my friend, Kirstin, for forwarding this recipe to me. I am a huge fan of peanut butter and chocolate. And brownies, I love them! I haven't made brownies from a box since I was a kid because they really are easy to make from scratch and taste so good. I did 1 and a half of the recipe below and used a 9x13" pan and baked it for 45 minutes. Do not make theses unless you are prepared to eat half the pan... they are that good!

Peanut Butter Swirl Brownies
by Kim D. RecipeZaar

* 1/2 cup butter or margarine, softened
* 2/3 cup sugar
* 1/2 cup packed brown sugar
* 2 eggs
* 2 tablespoons milk
* 3/4 cup all-purpose flour
* 1/2 teaspoon baking powder
* 1/4 teaspoon salt
* 1/4 cup creamy peanut butter
* 1/3 cup peanut butter chip
* 1/3 cup cocoa powder
* 1/2 cup semi-sweet chocolate chips

1. In a mixing bowl, combine butter and sugars.
2. Add eggs and milk; mix well.
3. Combine flour, baking powder, and salt; add to creamed mixture and mix well.
4. Divide batter in half.
5. To one portion, add peanut butter and peanut butter chips.
6. To the other portion, add cocoa and chocolate chips; mix well.


7. In a greased 9-inch square pan, spoon chocolate batter into 8 mounds in a checker board pattern.
8. Spoon 8 mounds of peanut butter batter in between the chocolate batter.


9. Cut through batter with a knife to swirl.
10. Bake at 350F for 25-30 minutes or until toothpick inserted near the center comes out clean.
11. Cool on a wire rack.


Now eat! Yum!


And watch for smiles...

Saturday, February 20, 2010

February 20th - Homemade Herbed Vegetarian Pasta Sauce


This is the first time I tried this recipe. Right off the bat I changed it to suit my own needs so I can officially call it my recipe now. It makes a very colorful, very fresh, super yummy (as my daughter would say) vegetarian pasta sauce. We put it on vermicelli for dinner. It required a lot of chopping (thanks, honey) but only 10 minutes of cooking time.

Herbed Vegetarian Pasta Sauce
by Tiffany Teske

- 1 medium onion, chopped
- 2 celery ribs, chopped
- 2 bell peppers, chopped (I used leftovers of a red, an orange, & a yellow)
- 2 Tablespoons olive oil
- 3 cups chopped fresh tomatoes
- 2-3 garlic cloves, minced
- 2 Tablespoons minced fresh parsley or 2 teaspoons dried parsley flakes
- 1 Tablespoon fresh oregano or 1 teaspoon dried oregano
- 3 teaspoons minced fresh cilantro
- 1 teaspoon sugar
- Hot cooked pasta

In a large saucepan, saute onion and celery in oil until tender. Stir in everything else. Simmer for 10 minutes, stirring occasionally. Serve over pasts. 4 c sauce.

Friday, February 19, 2010

February 19th - Radio Interview & a Dutch Apple Pie Recipe


Today was a full and exciting day. I was interviewed for close to an hour by Tanya Cooper for a blog radio show called Susan and Friends. Tanya is the wife of the former manager of Victory Thrift Store (if you read my blog you know I talk about Victory often). Her husband wore many hats in the Canmore community and while I only met Tanya a handful of times, I liked her right away. It just goes to show that you never know how someone will impact your life after you have briefly met them. Anyway, Tanya alerted to my blog via mutual friends at Victory. She liked this blog and asked me to be on her show. If you are interested in hearing it, just go here. I look forward to being on the show again soon and to having some time to speak with Tanya personally. I am interested in how she became a radio host...

My lovely friend, Kim, watched Emmanuelle and her 11 month old, Grace, while I was on the radio. Quin was up at Norquay, thanks to Andre. After the show, we walked to Phil's for pancakes and eggs, yum (don't tell Q). It is always great to see Kim & Grace!

I started work on my piece for the upcoming Women's Art Show. I got it laid out and made a big dent in it. I am being secretive but will reveal more soon...

Tonight I made a spaghetti sauce for an awesome dinner with the family. It was fun to have a glass of wine and to cook while Andre chopped. He is so busy with work that we don't get to do this as often as I would like. I will post the spaghetti sauce recipe over the weekend as I need to type up the recipe and upload the photos (and I am too tired). For now, I will leave you with the recipe for the apple pie I made yesterday. We ate the leftovers for dessert.


Dutch Apple Pie
From a 1998 copy of Home Cooking


This is a great pie to eat right out of the oven or to bring to a party where the whole thing will get eaten. While it tastes fine reheated the filling makes the crust mushy after it sits for a day or two. It is sweet and next time I will cut the sugar amount. The topping and crust are delicious, very much like a crisp.

Crust and topping
- 2 cups all-purpose flour (I use unbleached)
- 1 cup packed brown sugar
- 3/4 cup butter, melted
- 1/2 cup quick-cooking oats

FILLING:
- 2/3 cup sugar
- 3 Tablespoons cornstarch
- 1 1/4 c water
- 3 c diced peeled tart apples
- 1 teaspoon vanilla extract

Combine first four ingredients; set aside 1 cup for topping. Press remaining crumb mixture into an ungreased 9 in pie plate; set aside. For the filling, combine sugar, cornstarch, and water in a saucepan until smooth; bring to boil. Cook and stir for 1 minute or until thickened. Remove from heat; stir in apples and vanilla. Pour into crust; top with reserved crumb mixture. Bake at 350 for 40-45 minutes or until crust is golden brown.

Thursday, February 18, 2010

February 18th - A Little Collage


I have been working on this collage for a few days. I was inspired to start it because I had lots of book page and sheet music hearts left over from Valentine making. I usually start a collage with a vague idea of what I want but I never plan things out, aside from which materials to use. Once I gather the materials, which probably takes the most time, I lay things out, move things around, then just look at it for awhile before gluing things down. Sometimes, I use 3-D elements, which I did here. It can be difficult to make out everything in my collages, since little bits of text, 3-D elements, and fine details can get lost in photos. My favorite parts about this collage are the Polaroid (of course!), the 3-D hearts, and the two little glittered elements. This called Chorus and it is 8x8".

Wednesday, February 17, 2010

February 17th - FINALLY Finished My Bird Nests


I started making these a LONG time ago. They started as a papier mache bowl project with my three year old. Then we painted them. Then I made the felt eggs. Then I put it all together. All in all about 6 months. Yippee! One set of UFOs (Unfinished Objects) checked off the list... Aren't they pretty? I will share a tutorial on this someday...


Tuesday, February 16, 2010

February 16th - Frozen Charlotte Doll Heads


I have many little collections that serve me well when I go to make a mixed media piece or assemblage. I have a bit of a thing right now for Frozen Charlottes and German bisque doll parts. I just received a box of heads... and I realized, as my three and a half year old was helping me to unwrap and photograph them, that she accepts me just the way that I am. She doesn't question my weird habits and likes, she thinks all moms photograph doll heads by natural window light in the afternoon...


Monday, February 15, 2010

February 15th - Homemade Vegetarian Alphabet Soup


My daughter loves alphabet soup (what kid doesn't?). I usually buy Amy's Organic at $4 a can. Today, I decided to make some. I was inspired the last time I went to the grocery store and saw that they sell the alphabet pasta. I decided to try this recipe from RecipeZaar.


Healthy Alphabet Soup Recipe #112133

A delicious real alphabet soup which is much more nutritionally sound, as well as tastier, than the canned stuff. Recipe from "Stealth Health" Mar/99. In the ingredients, "Dried Italian herb seasoning is just regular dried Italian herb.
by LUv 2 BaKE

2 hours | 20 min prep

SERVES 6

* 1 cup onion, chopped
* 1 cup carrot, finely chopped
* 4 garlic cloves, minced
* 3 1/2 cups vegetarian chicken broth or chicken broth
* 3 cups water
* 1 cup dried white bean, rinsed (I used canned beans)
* 1 (398 ml) can tomatoes, cut up
* 1 teaspoon dried Italian herb seasoning or dried oregano
* 1/8 teaspoon cayenne
* 1 cup dry alphabet pasta


1. Combine first five ingredients; boil.
2. Add next four ingredients; boil; reduce heat, cover and simmer stirring occasionally for 1 1/2 hours until beans are tender.
3. Using a slotted spoon, remove most of the beans and transfer remaining liquid to a blender; process till smooth.
4. Return mixture and beans back to the pot; Stir in alphabet pasta.
5. Boil then reduce hear; cover and simmer 8 minutes until pasta is tender but firm.
6. Yield: 6 1 1/2 cup servings.


My daughter's initials are QQ....