Showing posts with label vintage. Show all posts

Wednesday, September 21, 2011

Three Artists on a Day Trip - High River & Nanton, Alberta - Part Two

If you missed Part One you can read it here....


Self Portrait in antique store, Nanton

After Dea, Millie, and I left High River, we headed to Nanton. Dea is working on an artists book, and the images that inspired it, were from Nanton. She had originally wanted to make collage using the images, but decided there was enough of a story line to warrant a book. And since she now NEEDED more photos for her book, and since one of my hobbies is collecting old images of other peoples' families, I begged to go along.


Ghost from the past.


The hands of time have stopped...


I heart cigar boxes...


Oh yes, another self portrait


Millie & I


Every orphaned typewriter I see, I want to take home...


Dea & Millie at the Tumbleweed Cafe


Oh, I am SURE we will!

Ladybugs were everywhere at Annie's in High River, we ended up with a stow away....

Dea did find her photos and letters. I found some as well. And some more silverware for my spoon assemblages, a few books, some buttons, and a charming little camera, all to be shared another day.... 

 Where is your favourite place to hunt for treasures?

Sunday, February 13, 2011

365 Days With Kiddos - #29 - Decorate for Valentine's Day - More Free Vintage Downloads


We are decorating for Valentine's Day today. Quin and I need to make her Valentines and I need to work on the heart book mark project I am teaching at the After School Club tomorrow so we are in full swing with preparations for the Day of Love. While we are at it, I thought we should print out a couple of my vintage valentines, on card stock in a larger size, for wall and door decorations. We may be a little behind, since tomorrow is the big day, but on card stock these should hold up for years to come. Why not start adding to your decoration collection? Just right click on the images, add them to your computer, print them out, cut them out, and hang them up. You can also use them for card exchange Valentines, by reducing the size and laying them out on one sheet, then printing and cutting out.


If you would like to look for your own free downloads on the web, you can thank my friend, Maureen, who posted a ton of links on my Facebook Page. To find them you can go to the post on the wall that has a link to my vintage Valentine blog post.

Friday, February 11, 2011

365 Days With Kiddos - #28 - Make Valentine Cards Using My Vintage Valentine Download Freebie


I love Valentine's Day! It has always been my second favourite holiday (my first is Thanksgiving). I didn't grow to embrace the symbol of the heart until a few years ago, but now that I like it, I oooohhh and ahhhh over it and any creative projects that include it. Sometimes I miss the boat on holiday projects because time moves so fast and I don't always plan ahead. I tend to think of a holiday the week it happens. But, not this year! Several weeks ago I got out an album of vintage Valentines that I bought for a steal at an antique shop near my father's cabin this past summer. They are adorable! I will have to upload several of them this week as a Vintage Finds post...

This week I needed to select a valentine for my daughter's upcoming preschool Valentine's Day party. I also needed to prepare for a card making workshop I was teaching at a local senior residence. I decided on the card above for both. Because this is a four fold card all the needs to be done is to print it out on a 8.5x11" sheet of paper and then to fold it. This card is special in that the net that the boy is "catching" the winged heart in is a cut out. The way I scanned the flat card you can see exactly where the net needs to be cut out. Once the holes are cut, a piece of tulle, or origami mesh, or even recycle net fruit bag can be glued in, then the card can be folded to hide everything except for the net in the cut out. My little gift to you is this card at hi resolution, ready to be printed for your own Valentines. Just right click on the image, save it to your computer, then print it out in colour. You can make these your own unique cards by using shaped scissors to cut a decorative edge around the outside of the card. Your kiddos can do this and they can help to glue in the mesh and to fold the cards. If you would like to make envelopes for your cards you can find an amazing array of free templates at Minkwood Designs.

Saturday, January 22, 2011

Vintage Find - A Fisher Price Music Box Teaching Clock (Just Like I Used to Have)


I had this clock! I had this clock! That is what I was screaming inside when I found this cute little vintage gem at a local church rummage sale a few months back. Let me just take a moment to reflect on the fact that toys were more durable when I was a child. I may sound like my grandparents, waxing nostalgical about the past and how things are just not made to last anymore, BUT IT IS TRUE! As a mother, I can speak for toys, and as a photographer, I can say the same about my equipment. Anyway, all I can say is that this beautiful toy is made of wood, and after all of these years it still winds up, tick tocks, and plays music. The musical movement was made in Japan. I can only imagine how many of these are laying in landfills, perfectly fine, having been chucked to make room for "better", more modern toys. My kids, and I, love it!


Just look at the cute illustrations... I want to go to this school!

Monday, January 10, 2011

New Work - BE Assertive Collage on Canvas

BE Assertive
By Tiffany Teske
Collage on Matboard and Canvas
10x12"
$125


I don't have any trouble being assertive but it may be something some of you are wanting to be as this new year begins... This may look familiar to you. I wrote about when I told you about teaching a children's collage class at my local library. I often work on my pieces in a couple of stages. I will create something, then look at it for a long time, and finally decide how to finish it, after reworking it once or twice.


About BE Assertive

This piece started off as a demo that I made for a class I was teaching at the Banff Public Library. The class was for kids aged 6 - 10. I was inspired by the book, 1 2 3 I Can Collage, by Irene Luxbacher. It is a wonderful book and there is a colorful collage much like this on the cover. I really enjoy working with circles and was struck by how this was such a professional looking piece, even though it is in a book for 4 - 7 year olds. I showed the book to my 4 year old daughter and she made a lovely piece that I also showed the kids in my class. The collage I created is on matboard and was unfinished, as far as being a complete piece. My main goal was just to have a visual, aside from the book, to inspire my students. Thanks to the Cloth Paper Scissors button challenge, I got out this piece and decided to finish it. I mounted the matboard on a canvas that I collaged with a sewing pattern. I then handsewed vintage buttons below the collage. This piece is made from a sewing pattern, decorative paper, vintage sheet music, a fortune cookie fortune, and vintage buttons. It is 10x12".

Sunday, January 9, 2011

Vintage Find - My Cousin's 1950s Themed Christmas Card (Think Norman Rockwell...)

Happy Holidays, compliments of The Krikkens

Ok, I had to share this with you! This vintage find was sent direct to my door, by my husband's cousin, Amy Beth (whom I incidentally knew BEFORE I knew my husband). I would have posted it earlier but our local mail being what it is, I didn't get it until after New Year's (along with about 20 other cards!). Amy Beth and her husband, Ramon, a photographer like myself, go all out for their annual holiday card. I am always in awe of his card. The thought that goes into them, the staging that is done, and the flawless execution of their idea is always incredible. And it doesn't hurt that they have THREE adorable boys to use as models. Great job, Ramon & Aim, spreading laughter, joy, and cheer to your friends and family far and wide!

Thursday, December 16, 2010

New Work - "Good News"

I have been meaning to post some of my newest work. I will do that in a couple of posts since I am badly in need of my bed...

Good News (Full View)
Mixed Media Collage by Tiffany Teske
8x8"

About Good News
My mother-in-law recently sent me some family photographs, including the one of the women in this piece. They were blueberry picking. I loved the sisterhood I felt from the photo and the nostalgia I felt for the days I used to go blueberry picking while living in Maine. I decided to collage the photograph onto one of my own photographs. The background photograph is an image I originally shot on Polaroid Spectra film, of a field in Alberta where I now live (although I live in the mountains). I scanned the image, saturated the colors, and printed it onto regular photo paper. I then hand sewed the vintage buttons onto the piece, in bunches, to resemble balloons, but also to symbolize memories of the past, being carried on the wind. I like how some of the threads of the different bunches are intertwined, like the lives of these women. And how one woman doesn't have any balloons... The birds are images that I love to use in my work, for their beauty and freedom. The fortune cookie fortune "Good news will come to you from far away" speaks to the future, but also of the distance of the past. The primary color palette is cheerful. The photograph has scalloped edges to go with the vintage theme and it is mounted onto a sewing pattern on canvas. It is 8x8".

Good News (Detail)

Good News (Detail)

Wednesday, October 20, 2010

Vintage Finds - Embroidered Tablecloth


I have a weakness for handiwork, especially embroidery, especially linens (tablecloths, curtains, towels, napkins, pillowcases). I can't seem to pass them by. Someone took the time to stitch all of these stitches and make something lovely. I don't care if their stitches are perfect on the back. Or on the front. I am drawn to the fact that it was done by hand by someone who cared about it. Even if it was machine embroidered I don't mind as long as it was made by someone who was not mass producing them in a factory. This is one of my favorite tablecloths in my large collection. There is a bird on each corner. It fits my daughters' little tea table perfectly. Cheep, cheep...


Friday, October 8, 2010

Vintage Finds - Aloha!

I am a nut for all things vintage. I love to go hunting for treasures, especially those from before I was born. I get giddy when I find a vintage book with beautiful illustrations or a roll of retro wallpaper or a beautiful hand embroidered table cloth. For a long time I have been wanting to record my finds here on my blog. I guess today is the day! So, for the first one I will show you perhaps the strangest, most pointless little knick knack I have ever seen. It has very little purpose, other than to make a tourist feel they have found a unique souvenir and to make someone smile... or even bust out laughing, which is what the manager of Victory Thrift Store did when I posted a photograph of this on their Facebook page for a contest on the best thrift store find. I won a $20 gift certificate! Pointless, I think not... did I mention it is a music box? Don't you love the little poem on the front?

"Waikiki Kimo
Basking in the sun
Round he goes
the music plays
"Aloha" he says to everyone"

Sunday, October 3, 2010

Photography Feature - Tea Time


Many people don't know that I hold two photography/art degrees from the University of Maine at Augusta. I made my living for many years as a professional photographer, shooting portraits and weddings in Maine, then maternity, baby, children, and families in the Ottawa/Gatineau regions of Ottawa and Quebec. Somewhere in there I started creating a lot of mixed media collage and switched from film photography to digital (although I still love analog photography, especially Polaroid which you can check out on my other blog). Even as a full time mom I can't make it through a day without making many many photographs, both of my kiddos, and of my favorite things. One of my favorite things is vintage tea cups. I have decided to make the lovely tea cups that I photographed while sharing tea time with a good friend in Maine this summer my first Photography Feature. There are more to come...


Friday, March 19, 2010

Tutorial - Camera Strap Cover - Revamp an Old Camera Strap Using Thrifted Upholstery Samples and Embroidery


You may or may not know that I hold two University degrees in photography (one as the major and the other as a minor to studio art). I am an artist, crafter, writer, and all around creative, but I usually say I am a photographer first when I am asked what I "do". Six months after I had my first child we moved across the country for my husband's job and I pretty much gave up my commercial photography business. I specialized in shooting black and white film images at the homes of my clients. I shot enough sessions that I would burn out motors and shutters so I would buy "new" used bodies for back ups. Last month, I started going through all of my analog camera equipment. I have 7 SLR bodies, from good working order to parts cameras, that I needed to test. I have gotten through 5 of them, with some of the results here. I love and miss shooting film and now that I know which cameras to keep, I will probably be doing more of it...

This brings me to the project. In the course of going through all my gear, I decided it was time to make my camera straps pretty. My recent sewing class has inspired me to find new sewing projects and a wide, boring, black neoprene camera strap volunteered to undergo a make over. This project can be adapted to your vision. The sky is really the limit on fabric and embellishments. You can even hand sew this project entirely if you don't have a sewing machine. If you don't have a camera strap you can find many boring and suitable candidates at the thrift store. I will walk you through a few simple steps and then off you go...

How-to Cover a Boring Camera Strap to Make it Pretty...

What you need...

- Wide camera strap
- Fabric, I used upholstery samples
- Sewing Machine and thread (or needle & thread to hand sew)
- Items for embellishment like buttons & embroidery thread


1) Using your camera strap to measure against, decide where to cut your fabric. My piece had some grommets I cut off. Here you can see I pinned the fabric up against the edge of the strap. You will need to make a tube around your strap that fits snugly. I think I only had about 1/2" of fabric beyond my strap on each side (so cut fabric 1" wider than strap).


2) If the ends of your fabric are not finished, finish them now. My sample had finished ends which I just turned under when I put my cover on. It was too short, however, to be used as one piece, so I did sew two pieces if it together. I didn't bother to line up the pattern because I knew I would embellish one end... I sewed the buttons where my obvious seam from joining the two pieces is.


3) You can embellish the top front side of your fabric (the part you will be able to see) now or at the end. I actually did all of my embellishing at the end, when my cover was already on, using a curved tapestry needle. I would suggest doing the embellishing before if you want to remove the strap (since I may have sewn through parts of the strap). I just embellished one end. I did it on the end because I knew that part would show while wearing my camera. If your hair is short you could embellish the whole strap, since it won't be hidden under your hair. I cut a flower and paisley from my fabric and appliqued them on, using embroidery thread.


4) Put wrong sides of fabric together, pin, and sew, using a straight stitch, reinforcing each end by front and back stitching. I used a 1/4" seam allowance. Turn your tube right side out.


5) Slide your cover onto your strap. If you already embellished, you are now done, If not, go ahead and do it now.


Voila! Now go, shoot something, and wear your camera with pride...

Thursday, February 25, 2010

February 24th & 25th - Women's Art Show Piece, Using Portraits from Haiti


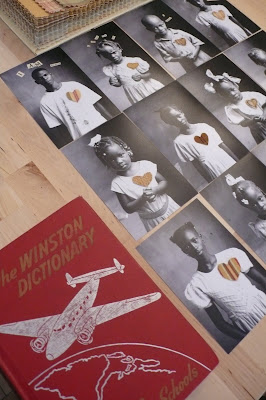
(The beginning of my piece; I selected images from my negatives, had them printed, arranged them, added fabric hearts and collaged text from a vintage dictionary.)

Usually when I drop off the face of my blog for a few days it is because I have been busy creating (and I am probably under a deadline). My post to Thing-A-Day for February 23rd was the tutorial below, although I posted about the making of the project on the 22nd. And my last two posts to TAD have been about the piece I have been making for the Banff Public Library's Women's Art Show. I have been in this inspiring show with my fellow creative Banff sistas, for the past three years. I have been working on this mixed media piece for about a week, here and there.The show corresponds with International Women's Day on March 8th. There is always a theme but artists do not have to work within it. This year it is "Equal rights, equal opportunities: progress for all". I would have to say that I didn't work within the theme, at least not only in a women's rights sense. I chose to do my piece on Haiti. I have been there twice. I used images I shot for a child sponsorship program and collaged on them with text and fabric. I used both male and female images that I embroidered together. The next post will be the finished piece.


(I hand embroidered the photographs together using a variety of stitches)


(Once I had them all emboidered to one another I laid them onto handmade paper. The final steps will be in the next post).