You may like my blog if you like art, photography, crafting, sewing, upcycling, cooking, baking, reading, traveling, thrift store finds, parenting, kid's activities, writing, the environment, natural living, activism, and more... I am dedicated to living an artful & creative life, each & everyday.
Saturday, August 29, 2009
Goodbye to My Grandfather
Poppa, Quin, & Meme December 2008
My Poppa lived a long life. I believe he was 88. He had been in good health up until recently. He was still playing golf last year. 18 holes. He lived a GOOD life. He went into hospice early in the week. They gave him 3 months. He lived for 5 days. I am the only immediate family member who lives far away. I was able to speak with him by phone each day, and he was able to talk with my oldest daughter and my husband. Everyone else was able to be with him each day and that helped me to feel more like I was with him. We were close for my whole life. I feel blessed to have had my grandfather for 35 years. While it is very difficult to think that he is gone I am happy that in the end he went peacefully with my mother, grandmother, and aunt by his side. I am also happy that I spoke to him often, visited him whenever I could, and told him I loved him whenever I saw him. I was able to see him less than one month ago at our family reunion. There are no regrets. We will now head to Minneapolis to be with our family.
Poppa playing with Quin May 2008
I will never forget how we spent Friday. This was the last day of my grandfather's life and we all knew it was his last day. Two days before I had sent him and 8 page letter telling him how I felt. I knew it would not make it in time when they called me on Friday. I had photographed the letter, since I was not sure if I would get the original copy back (which I will not as it will be buried with him, as will other letters from family members) so I photographed each page so that I could type it up late or re write it by hand. I emailed the JPEGS to my husband who was kind enough to fax it to the hospice ASAP. My wonderful sister made sure it was received, and while my family was in the room, she read the whole thing directly into his ear, continually reminding him it was from me. He did listen to it, and he did respond to certain memories I had written down. In the end he tried to thank her for reading it. Later in the day he went into a coma. Being so far away I wanted to keep my thoughts on him all day, as I had all week, and to include my children in thinking about him. I had told a friend that I would watch her daughter while she performed the cane dance, a folk dance, for the seniors at a local seniors lunch. Before we left to meet her, Quin and I put on some music and she, Emmanuelle, and I did "a dance for Poppa". Later in the day, we went to a pot luck dinner with some other families at a local park. We talked about Poppa on the walk there and on the walk home. On the way home I found a blue jay feather on the ground. I have found many feathers in my life but this is not one of the ones I normally find. My grandfather loved birds. He had feeders outside his house and we would sit outside and watch the birds. When I saw that feather I really thought he was already gone but he would hang on until the next morning. Before going to bed my daughter and I read one of her library books, "Feathers, Poems about Birds", by Eileen Spinelli. We thought about Poppa the whole time. We all went to bed thinking of him. Goodbye Poppa, we love you!
Kiki's Wedding - Polaroid Emulsion Lift Series
I originally published this letter and these images over on my Polaroid blog. I started this series of Polaroid Emulsion Lifts with the aim to submit them to a magazine which has ceased publication. I was happy to complete it, publication or not, for my very dear friend, Kirsten. The series is called Kiki's Wedding.
Dearest Kiki
Your friendship is something that I cherish even more than words can say. And the best part about it is that I know you know exactly what I mean without my even needing to say anything. I consider you a sister.
I have been working on a series of images from the amazing weekend during which you wed Chris. While I had already made these images into Polaroid transfers, I felt I should push them a bit further and try making them as Polaroid emulsion lifts. They are one of a kind, hand placed on handmade paper from India. They are even lovelier in person. I wish I was at your kitchen table right now, showing them to you while drinking tea, or wine, and eating chocolate...
I will never forget the weekend you got married. It was a wonderful trip for Andre and I, and to be able to stay at the Inn, with you, and friends of yours who have since become friends of ours. I would not have missed being there for the world. Thank you for treating us as if we are part of your family. It was good for my soul to be back in Maine and good for my heart to see you so very very happy. Remember when used to we wonder if we would find our true loves? How lucky for us both that we have...
I have so many rich memories from that cold, gray, rainy weekend in Maine in May. I must say that is how I like Maine best. Call me crazy, many people would, but my favorite Maine is moody Maine. And they say it is good luck to be married when it is raining. That weekend was perfect. The cold dampness only made the Inn, the chapel, tent, and the barn seem more cozy. It was magical to look out over all of your dining friends and family and to see their breath on the air, as they talked and laughed together. They had come together to witness your wedding and nothing could dampen their love for you and Chris. It was beautiful.
All of the other memories in my mind have to do with the timeless elements of your special day and the days surrounding it. The Inn was brought me back in time to an era in which I must have once lived, it just seems so familiar. The curve of the gleaming banister on the wooden stairs; the gilded empty frame that hung above the fireplace, flanked on either side by creamy white antique lamps; the old ornate wing backed chair next to the lacy curtains that let in a bright white light; the antique photographs of both of your grand parents, when they were young; the daffodils and pine boughs on our tables; your lovely dress that was truly made for you to wear, it came alive when you stepped into it; your enchantingly scrumptious cake dressed with twigs and birds a top a round of birch, such a shame to cut it apart but to much of a temptation not to. These remembrances and so many more will live on in my mind and heart for the rest of my days. I am grateful to have been a witness to the first day of the rest of your life.
Love to you and Chris,
Tiffany
(Images and Text by Tiffany Teske)
Labels:
friends,
Maine,
Photo series,
Polaroid,
polaroid emulsion lift,
Tiffany Teske
Thursday, August 27, 2009
Why Do Dandelions Get Such a Bad Rep?
Just look at this beautiful vintage card of a dandelion that I picked up at a recent rummage sale. I am using it to illustrate my point, which I started thinking about the other day, when Quin, Emmanuelle, and I were walking back from Playground Pals, Quin's favorite summer activity. There were tons of dandelions that were ready to have their seed blown on the wind, and Quin was eagerly pulling them up and giving them a blast of air to send them on their way. I happen to love dandelions both when they are yellow and when they are white, although I probably like them best when they are white. They may be a weed but they are at least cheery. And you can make wine out of them. And tea. And the greens are good in salads. And you can weave them into dandelion crowns. Plus when I pick one up to blow on it, it reminds me of childhood. Just look at the images below, the first from two summers ago and one from this past spring. Have you picked and enjoyed a dandelion lately? It could be time that you did.
Wednesday, August 26, 2009
Andre's New Favorite Potato Pasta Recipe
Pasta with Pesto, Potatoes, and Green Beans
by Martha Stewart
Photo by Tiffany Teske
This recipe has simple ingredients and is so delicious we couldn't believe it. My husband loves potatoes, so I am always looking for new recipes that include them. This was a winner with him, my 3 year old, and me. The second night, Andre put chicken on his, and I put salmon on mine, but it is a vegetarian, actually vegan recipe. A few notes... I used round white potatoes, but you can use new potatoes. You just want to make sure you chose a waxy potato so that after all the time they boil in the pot they do not turn to mashed potatoes. And cavatappi is corkscrew type of pasta. The package I bought is actually called Scoobi Doo, by Unico.
Ingredients
Serves 4.
* 2 waxy potatoes, peeled and cut into 1-inch cubes
* 1 tablespoon salt
* 8 ounces cavatappi
* 8 ounces green beans, trimmed and halved
* 1/2 cup Pesto
* Pepper
Directions
1. Peel and cut 2 waxy potatoes into 1-inch cubes; place in a large pot of water; bring to a boil.
2. Add 1 tablespoon salt and 8 ounces cavatappi or other short tubular pasta; return to a boil; cook 2 minutes.
3. Add 8 ounces trimmed and halved green beans. Return to a boil; cook until vegetables are tender and pasta is al dente, about 6 minutes.
4. Drain; toss with 1/2 cup pesto; season with salt and pepper. Serve warm or at room temperature.
Tuesday, August 25, 2009
A Lovely Little Birthday Party
What could be better on a lovely Saturday afternoon but a birthday party for a little friend? Good fun for the whole family!
I was drooling over this sweet little art studio in the yard of my friend's friend, where the party took place. It has its own little wood stove inside, for those chilly winter days. I am soooooo envious!
Quinny bakes some more cake for the party...
Organic yellow watermelon, anyone? Why, YES!!
I know they are dreaded plastic but who can pass up a rainbow?
A little winged friend left behind some beauty...
I love the texture in this chair, my breezy summer dress, and the retro awesome linoleum pattern.
Soon there will be a sunny sunflower in this pot!
What year is it? Hard to tell isn't it?
Wee friends enjoy some healthy snacks before we bring on the cupcakes.
Even this tiny ant won't pass on a cupcake. Thanks for the delicious treats and for a wonderful party!
If you would like the cupcake recipes you can see this post and this post...
Saturday, August 22, 2009
Birthday Gifts You Can Make - Part Two - Crayon "Cakes"
Crayon "cakes" are the second craft we made for our friend Aven's third birthday. These are so simple and they help a child to reduce, reuse, and recycle because they can take all their crayon stumps and make them into a sort of super crayon.
These crayon cakes draw raves from both kids and adults a like. They do not roll so they are awesome for plane rides, car rides, going out to eat... And the top part of the cake ends up being wax that rises to the top and separates from the color in the wax, so when you put the cakes right side up the non color part of the cake is on the table, so they don't leave colored wax on whatever you set them on.
Sooooo, let's get started...
How To Make Crayon Cakes
You will need:
- Old crayons
I collect bags of crayons when I see them at the thrift store. I also take crayons home from restaurants that give each child a new package of three crayons when they come for dinner. Then, of course, there are the crayons we use at home. It is difficult to say how many you might need. It depends on how many finished cakes you want and the size of your crayon numbs. I would say you need about 18 one inch crayons pieces per muffin pan that makes 6 muffins, and maybe 12 one inch crayon pieces per muffin pan that makes 12 muffins. Just experiment the first time. Wax crayons are better than soy, and they say not to mix them, but I really don't pay any attention to what mine are made of and I have not had a problem.
- Silicon or metal muffin pans
My mother gave me a ton of silicon pans that are shaped (snowflakes, jack o lanterns, Christmas trees) and while I gave them a whirl for making muffins, they never cooked right and made the muffins taste like plastic... I was a bit leery of the thought of baking in silicon anyway. Since I like to find new uses for the things I own, I turned them into our crayon cake making pans. Metal pans work fine, too, and you can often find them in various shapes and sizes for a very reasonable prices at the thrift store. I would not use silicon pans for baking food after making crayon cakes in them, and I am not sure what to say about using metal ones for both purposes. I have a different set of metal pans I use for crayon cakes and non food molds. You do not need oil either type of pan. The cakes will pop right out when they have cooled and hardened.
- Baking sheet
- Cooling rack
Making the Cakes
1) Preheat your oven to 250 degrees.
2) Gather your crayons and put them in a water proof container along with warm water (if the water is too hot the crayons will start to melt). After a minute or two you can pour out the water. The paper around the crayon should now come off very quickly with little effort (I wish I would have thought of this step the first few times I made these. It would have saved my husband, child, and I, a lot of peeling time!). Remove all the paper from your crayons.
3) Do not oil your pans. Break crayons into approximately one inch pieces. There is a lot of leeway here, so find your own way you like to do things. I tend to put many shades of the same color into each tin, so maybe 5 kinds of green, from hunter to seafoam, all in the same tin. You can also do something like all the primary colors together like red, blue, and yellow. Some colors seem to mix together and get muddy while others stay apart. In theory, if you let them melt and don't stir them or jostle them, they should stay separate. Just have fun and experiment. If using many colors, try to mix them so that all the pieces of one color are not together. Do not over fill the tin. Stop filling when the pieces are just below the top. They will melt down to a thickness of about half of the pan.
4) Put the pan on a baking sheet, just in case anything melts over. Put the pan and sheet in the oven and turn the heat off. Leave the pans in the oven and check the progress of the cakes melting. You do not need to watch over them. Just do what you like and check them occasionally. Once they look completely melted remove them from the oven and put the sheet on a cooling rack or trivet. Once the cakes have hardened you can pop them out of the pan.
5) Stack three cakes or more together and tie with a ribbon, jute, raffia, whatever you like. I save all the ribbon and decorations we get on gifts for this purpose. You can attach a little tag or include a recipe card with the gift that tells the recipient how to make their own crayon cakes.
You can make a coloring book out of computer paper to go with the cakes. You can trace over the images in coloring books using carbon paper or by holding the page and paper on the window like using a light box. Or you can draw simple line drawing by hand. Gather together your pages and cut a front and back cover from decorative paper. Using a hole punch, punch two holes on the left side on the top half of the page and two holes on the bottom half. Pass ribbon through the holes and tie. Yes, coloring books are cheap, but this way you can tailor the drawings to the little one's interests. And who would not like a special coloring book made just for them?
One last post on making birthday gifts to come... stay tuned. For the first project, Play Dough, click here.
Labels:
birthdays,
gifts you can make,
handmade,
homemade gifts,
how-to,
kid craft
Friday, August 21, 2009
Birthday Gifts You Can Make - Part One - Play Dough
I have been meaning to write this post for ages, and now that we are off to a birthday party tomorrow and we have been making these gifts the time is right...
We received an invitation to Aven's birthday party one day when we were out. When we walked up to the front door we saw a crayon colored invite scrolled around Quin's forgotten sunglasses, stuck in the door. What fun to find an unexpected invitation for "Casual Backyard Fun"! The thing that most struck me about this invite was the line that stated "Gifts are OPTIONAL & stickers, pencil crayons, or little Dollar store balls, etc. are very welcome - save yer $". This was such a nice and refreshing sentiment. Since we usually make the gifts we give, it made me feel that our effort will be accepted and appreciated.
So, today, we got to work. The first thing we made was play dough. We made two batches, since Quin was in need of some fresh dough. We hope Aven loves it as much as we do.
I was given this recipe by a friend who works in a day care and it brought back the days in high school when I worked in a day care center...
Play Dough
2 1/2 cups all purpose flour
1/2 cup salt
1 Tablespoon Alum Powder (I buy it in bulk at a health food store)
2 cups boiling water
3 Tablespoons cooking oil (vegetable)
food coloring
Mix dry ingredients. Add water and oil. Mix well until it forms a dough. Divide into however many ball you need for the number of colors you want. Knead dough balls until they no longer sticky and add food coloring according to the colors you want to make.
I usually make 4 - 6 colors. There are mixing charts on the back of the food coloring package. Here are some colors to get you started...
Pink - 1-2 drops of red
Orange - equal parts red and yellow
Purple - equal parts red and blue
Black - 3 drops red, 3 drops blue, 2 drops green
Brown - 2 drops green, 2 drops red, 6 drops yellow
Turquoise - 1 drop green, 3 drops blue
Lime - 1 drop green, 9 drops yellow
Here is an extensive chart from a cake decorating site here.
My goal is to experiment with nature dyes one day.
We like to make a rainbow of play dough colors for our special friends. We package them in reusable plastic containers that can be used again. We include a copy of the recipe so that the child and their parents can make more play dough. I am looking into glass containers we can give play dough in. I was thinking of canning jars...
Stay tuned for Part Two.
Labels:
birthdays,
family,
friends,
handmade gifts,
how-to,
kid craft,
play dough
How to Freeze Blueberries
A couple of weeks ago I was thrilled to find 5 pound boxes of blueberries at our local grocer for $8 a box! That is the best price I have ever seen in these parts. I bought two boxes, then went back for a third. I have to admit that while I had the knowledge on how to freeze the berries, it was my wonderful hubby who did the deed. Here are 6 steps to freezing blueberries.... nothing could be more simple.
1) Buy or pick a plethora of blueberries (or any other berry for that matter).
2) Sort through them and discard smashed or green berries, as well as stems or leaves.
3) Wash berries.
4) Pour a single layer of berries onto a baking sheet and let them dry throughly.
5) Freeze berries on baking sheet.
6) Store in freezer safe containers.
Here's to blueberry pancakes all winter long! And frozen blueberries, straight out of the freezer, are one of my daughter's favorite snacks. Like little blueberries slushies. Just let thaw for a minute, then eat. Yum!
Thursday, August 20, 2009
Light Leaks Issue 14
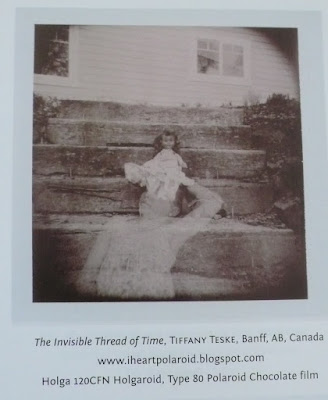
I have been so behind since returning from Holidays. I saw the newest issue of Light Leaks in my pile of mail, and I knew that one of my images was in it. But since I like to savor these moments, I waited until I could take the time to properly look through the issue. So, yesterday, the time arrived, and I tore off the envelope to find what I think is my favorite issue of Light Leaks. The theme is childhood. As some of you know, I use nostalgia and memory in a lot of my work, and childhood naturally comes into play. And since becoming a mom, I spend a lot of time photographing my children. I jumped for joy when one of my images was chosen to be in this issue. It is a beautiful issue, filled with emotional images, from some amazing photographers who I am excited to check out further. Great job again, Light Leaks!
My Image - The Invisible Thread of Time, a double exposure Holgaroid shot using a Holga CFN 120, with a Polaroid Back, using Polaroid Chocolate Type 80 F film from PolaPremium
My image in Light Leaks
One of my favorite images from another photographer in this issue. Image by Rebecca Tolk
Wednesday, August 19, 2009
Purple Monkshood
We came home from our holidays to a back garden that was lush and green, thanks to Mother Nature and our neighbor. We have only lived in this house about a year, so this year, when my friend, Hannah, and my husband were planting perennials and annuals, (while I was busy with our new babe) they were not completely sure about two clumps of plants that were growing like wild fire. We all thought they were weeds, but decided to let them have a chance for this season, to try to solve the mystery. Well, as it turns out, they did bloom while we were away, and the moment I spotted them upon our return I knew exactly what they were! Purple Monkshood. I photographed these once for a card line I sold in Maine. They make me nostalgic for my old home. I miss Maine.
Tuesday, August 18, 2009
Vanilla Cupcake Recipe, Otherwise Known as "Part Two", as Promised...
I slipped up this AM and ran out of the house to bring Q to play with her buddy, A, and I forgot to bring the cupcake cookbook that I promised her mom, so sorry, Heidi!! And while I told her she could come to this blog to get the chocolate cupcake and icing recipes, she teased me in the comments section with "where is part two?!" which I promised around the time our newest addition joined us. So, here it is, without further a do...
Vanilla Heaven Cupcakes
By Elaine Cohen
From the book, Super Duper Cupcakes
Makes 18 cupcakes
1 c milk, at room temp
3/4 c egg whites (about 6 large or 5 extra-large), at room temp
1 teaspoon pure vanilla extract
2 1/4 c plain cake flour or all-purp
1 3/4 c sugar
4 teaspoons baking powder
1 teaspoon salt
12 Tablespoons (1 1/2 sticks) unsalted butter, softened and cut into 12 pieces
1) Set oven rack in the middle position. Preheat the oven to 350 degrees. Line muffin pans with cup liners.
2)Pour the milk, egg whites, and vanilla into med bowl and mix with a fork until blended.
3)With an electric mixer, mix the cake flour, sugar, baking powder, and salt in a bowl at lowest speed. Add the butter pieces; continue beating at slow speed until mix resembles moist crumbs, with no powdery ingredients remaining, about 1 minute.
4) Add all but 1/2 c of the milk mixture to the crumbs and beat at med speed for 1 minute. Add the remaining 1/2 c of milk mixture and beat 30 seconds longer. Stop the mixer and scrape sides of the bowl. Return the mixer to med speed and beat about 20 seconds longer.
5) Pour the batter into the muffin cups so that the cups are 80% full. Bake for 17 - 20 minutes. Insert a toothpick into the center of a cupcake; if it comes out clean, it is done.
6) Transfer the muffin pans to wire cooling racks or away from the hot oven. Let them cool for 10 minutes. Place onto rack or plate to continue cooling. Wait at least one hour before frosting.
You can make pastel colored cupcakes by adding a couple of drops of the food coloring of your choice.
Hope this helps, Heidi! We can't wait for A's birthday :)
Labels:
birthdays,
cupcakes,
Dessert recipe,
family,
food,
friends,
recipe,
Tiffany Teske
Monday, August 17, 2009
Balsamic and Maple Glazed Salmon
Last night my wonderful hubby cooked up some salmon that our neighbor caught and gave to us. It was a huge and beautiful looking fish and it tasted wonderful. Andre baked it in the oven with some dill and made a glaze that we had while visiting friends in Victoria Beach. It is super simple and so good!
Balsamic and Maple Glaze
One Part Balsamic Vinaigrette
One Part Real Maple Syrup
Bring to a boil and reduce until thickened. Pour on warm fish. Eat. MMMMM!
Subscribe to:
Posts (Atom)