Yes, you read that right. I have to admit that while I make a lot of things, I was both inspired and delighted by the idea of being able to make chalk. Every time Quin writes on the driveway, front steps, or deck with chalk, it brings me back to my childhood. I love the bright colors of the hearts and Qs that are scrawled everywhere. And I love getting in on the action. But why make sidewalk chalk when you can buy tubs of it for so little? Well, why make anything? For me, I enjoy it, and my Quin enjoys helping. I find making things we can easily buy at the store a great way to teach my kiddos things in a way that they enjoy learning. As many people who sew know, these days it is NOT cheaper to sew clothes than to buy them. So many things that used to be cheaper to make are now available for super cheap. My top motivated in making something is not saving money. Making something with my hands, spending time with my kids, using local resources, recycling or upcycling items that might get throw away, and learning something new come first. I also like to know what is in things and to be able to personalize things. Which brings me to the sidewalk chalk. It uses simple ingredients and tools that most people have around the house. It is non-toxic (although I would never let my kids eat it, plaster of paris should never be ingested), can easily be made with kids assisting, and can be personalize by the colors they choose and the molds that you have. Plus it makes a great gift. Because I wrote this tutorial for the wonderful crafty website, Craftbits, I will not re-write it here but will direct you to the project link on their site. Have fun!! And please let me know if you currently make chalk or if you are inspired to by this post...
You may like my blog if you like art, photography, crafting, sewing, upcycling, cooking, baking, reading, traveling, thrift store finds, parenting, kid's activities, writing, the environment, natural living, activism, and more... I am dedicated to living an artful & creative life, each & everyday.
Showing posts with label gifts you can make. Show all posts
Sunday, September 26, 2010
Saturday, June 19, 2010
Monster Puke Bubble Bath - A Good Homemade Birthday Party Gift for a Boy (or a Girl)
Quin, my daughter, likes to make the birthday gifts that she gives to her friends. I used to be somewhat unsure about giving handmade gifts at a birthday party but I have since learned that most of my friends and their children really appreciate them. I know that my kids have more toys than they know what to do with, so it is always nice when they receive something unique and made just with them in mind. One of our standbys is play dough. What kids doesn't love it? Some moms that I know don't like it, because it can be "messy" when it dries up but you can always use it outdoors. You can find my recipe here. Crayon cakes are another favorite which you can find out how to make here. For more ideas you can look for the label "gifts you can make" on the right hand side of my blog, midway down...
Recently, Quin went to the party of a fellow preschool classmate and we wanted to make him something different. We decided that a four year old boy would probably like the idea of foaming monster puke bubble bath. Quin herself loved the idea. I found the recipe on Craftbits.com. I liked that the ingredients could be customized to our liking and the the ingredients were mostly natural. In the end, when Quin tried our bubble bath, it was not very foamy but did make the bath tub a nice green. I think it is because I used hand soap as my liquid soap when I should have used liquid dish washing soap.
Monster Puke Bubble Bath
Originally on Craftbits
Ingredients
1 cup of Olive oil
1/2 cup of Liquid soap (dish washing soap)
1/4 cup of Honey
1/2 tsp of Green food coloring
1 tbs of Peppermint fragrance or extract (I used peppermint essential oil so I used 1/2 teaspoon plus a few drops. I just wanted enough for a good scent.)
Directions
Mix all the ingredients together. We put ours in a recycled plastic peanut butter jar and had more than enough leftover for our own test run in the bath. We made a paper label to go over the PB label, put on some monster stickers, then attached a circle of recycled fabric and a plastic monster toy to the lid with hemp cord. Voila!
It was a hit with the recipient :)
Sunday, March 14, 2010
Tutorial - How To Make Baby and Child Leg Warmers, and Adult or Child Arm Warmers With Thrifted Scarves
Warning: Lots of cute photos of kiddos to come... all images by Tiffany Teske

Baby Leggings

Child Arm Warmers

Baby Leggings & Child Arm Warmers

Adult Arm Warmers

Child Leg Warmers
I have had the idea to make these for several months now. I have been taking a sewing class, one of several I have taken over the years, and my favorite part about it is that I am given THREE UNINTERRUPTED HOURS to work on whatever I want. That is about how long it took me to make two pairs of baby leggings, for my babe and for a gift, and a pair of leg warmers for my daughter, who is almost 4 years old.

Front of Child Leg Warmers
I love to work with thrifted materials. Some are given to me and others I seek out at the thrift store, yard sales, and rummage sales. There are so many possible places to find fabrics that I rarely buy new fabric. I always keep an eye out for materials that I can use in the future, especially vintage prints. This allows me to amass a stash so that when I have time to work on something I just go "shopping" in my studio and I usually find what I am looking for. I also stockpile materials for when I teach recycled art and craft classes to adults and children.

Back of Child Leg Warmers + Cute Baby
The two scarves I used for these projects came from Victory Thrift Store. They normally sell scarves for $2 each but they often have a buy one, get one for 99% off sale. It cost me $2.03 for these scarves. They are very different from one another. Since I had never made these I didn't really know what to expect when sewing the scarves. I looked for stretchy scarves but all scarves are different. I spent a long time touching, stretching, and anticipating. The important factor is that they stretch out and then back into shape. They need to stretch enough to go onto the baby or child's leg and then to stay there. As mentioned in the title, if they are long enough these can also be used a adult arm warmers with no modifications.
How To Make Baby Legs, Child Leg Warmers, and Adult Arm Warmers With a Thrifted Scarf
This is a simple project for even a beginner. The only trick is selecting the right scarf. Read through all of the instructions for tips on this and rest assured this is an easy project that will leave you feeling accomplished in the end.
What you will need:
- a stretchy scarf
- a sewing machine (or Serger if you have one, I don't)
- coordinating thread
- needle for stretch fabrics
- pins
Optional items for embellishment such as vintage buttons, embroidery thread, ribbon...

One of my two scarves before I started cutting...

Now with the ends cut off and cut in half.

Zigzag stitch at the bottom and top of one legging. I didn't fold this edge over and stitch since this material wouldn't hold like that. I just stitched around near the top.
Step One
Decide on the length you want the leggings to be and then decide how to cut your scarf. It will completely depend on your scarf and your needs. You will need about a 1/4" seam allowance on each end. For my fuzzy rainbow leggings I was able to get two pair from the one scarf, meaning I cut four pieces from the full length and I used the full width. For my argyle ones I cut the scarf in half for one pair and I guesstimated on how tight I wanted them. I did end up cutting a bit of the width off, so I used 3/4 of the width. Where and how you cut will depend on the fabric. For the stretchy fuzzy scarf I needed to sew a line, using zigzag stitch at each end of a piece BEFORE I did any cutting because the knit fabric unraveled once cut. This is all I did at the top and bottom to finish those edges. For the argyle fabric I could cut without any fraying.
Try stretching the ends of the scarf to see if they are finished, they probably are if the scarf is knit. The way they are finished may make them too tight when folded in half, around the upper leg, so it is best to cut the ends of the scarf off in this case and re-sew a zigzagged line across the bottom and top of your two pieces, stretching a bit as you sew. If you have a serger, use it. I had my instructor serge the second pair of rainbow leggings so I could see if there was a difference in quality. I think hers are more durable but my sewing machine and zigzag stitch did fine. The only thing I can say about sewing such a "hairy" fabric is to keep a seem ripper handy for when you get stuck. You will never notice where you have used it in the end. I had smooth sailing with the argyle pair.

Piece with finished ends folded in half and ready to stitch up the side.
Step Two
Now that you have your pieces, you are ready to fold them in half, right sides together, and to zigzag stitch up the side. My knit scarf didn't have a right and wrong side.

Stitched
Step Three
Turn your fabric tube right side out. I am finished with the rainbow pair at this point. I need to stitch the top and bottom edges of the argyle pair. I folded the fabric, which stayed without pinning, in about a half inch, and zigzag stitched around, near the edge. They are now complete and can be worn as arm warmers or leggings (see photos below).

Finished top edge.

The same arm warmers as above, now on my daughter...
Embellish

Some Possible Materials
You can embellish these leggings/warmers whatever way you chose. The sky is the limit. I decided to use vintage buttons, embroidery thread, ribbon.
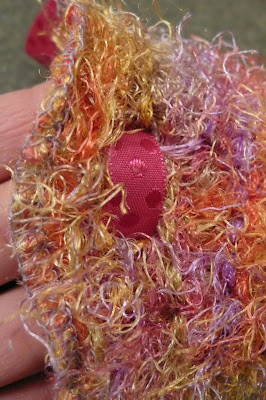
Threading the ribbon from the "wrong" side out...
Because the rainbow leggings have such a loose knit I was able to thread the ribbon through them easily. I started in the middle of the front of each one (turning them so the seem would be inside the leg) and threaded from the inside to the outside, so there would be enough ribbon on the inside so that I could sew the button to it from the outside.

The "right" side of the legging with the ribbon coming out from the inside.

Front
Next I sewed the button onto the "hidden" part of the ribbon, using embroidery thread. In my mind, this is the front of the legging but of course could be the back...

Back
I continued to thread the ribbon in and out of the legging until I got to the middle part of the back. I then brought the two sides of the ribbon out the same hole and tied it in a bow. Voila!
If you have any questions or comments about this project please leave them here. I would love to know if I have inspired you to try this and to see your leggings on your blog. I will now leave you with a few more images of the leggings in action...


Baby Leggings
Child Arm Warmers
Baby Leggings & Child Arm Warmers
Adult Arm Warmers
Child Leg Warmers
I have had the idea to make these for several months now. I have been taking a sewing class, one of several I have taken over the years, and my favorite part about it is that I am given THREE UNINTERRUPTED HOURS to work on whatever I want. That is about how long it took me to make two pairs of baby leggings, for my babe and for a gift, and a pair of leg warmers for my daughter, who is almost 4 years old.
Front of Child Leg Warmers
I love to work with thrifted materials. Some are given to me and others I seek out at the thrift store, yard sales, and rummage sales. There are so many possible places to find fabrics that I rarely buy new fabric. I always keep an eye out for materials that I can use in the future, especially vintage prints. This allows me to amass a stash so that when I have time to work on something I just go "shopping" in my studio and I usually find what I am looking for. I also stockpile materials for when I teach recycled art and craft classes to adults and children.
Back of Child Leg Warmers + Cute Baby
The two scarves I used for these projects came from Victory Thrift Store. They normally sell scarves for $2 each but they often have a buy one, get one for 99% off sale. It cost me $2.03 for these scarves. They are very different from one another. Since I had never made these I didn't really know what to expect when sewing the scarves. I looked for stretchy scarves but all scarves are different. I spent a long time touching, stretching, and anticipating. The important factor is that they stretch out and then back into shape. They need to stretch enough to go onto the baby or child's leg and then to stay there. As mentioned in the title, if they are long enough these can also be used a adult arm warmers with no modifications.
How To Make Baby Legs, Child Leg Warmers, and Adult Arm Warmers With a Thrifted Scarf
This is a simple project for even a beginner. The only trick is selecting the right scarf. Read through all of the instructions for tips on this and rest assured this is an easy project that will leave you feeling accomplished in the end.
What you will need:
- a stretchy scarf
- a sewing machine (or Serger if you have one, I don't)
- coordinating thread
- needle for stretch fabrics
- pins
Optional items for embellishment such as vintage buttons, embroidery thread, ribbon...
One of my two scarves before I started cutting...
Now with the ends cut off and cut in half.
Zigzag stitch at the bottom and top of one legging. I didn't fold this edge over and stitch since this material wouldn't hold like that. I just stitched around near the top.
Step One
Decide on the length you want the leggings to be and then decide how to cut your scarf. It will completely depend on your scarf and your needs. You will need about a 1/4" seam allowance on each end. For my fuzzy rainbow leggings I was able to get two pair from the one scarf, meaning I cut four pieces from the full length and I used the full width. For my argyle ones I cut the scarf in half for one pair and I guesstimated on how tight I wanted them. I did end up cutting a bit of the width off, so I used 3/4 of the width. Where and how you cut will depend on the fabric. For the stretchy fuzzy scarf I needed to sew a line, using zigzag stitch at each end of a piece BEFORE I did any cutting because the knit fabric unraveled once cut. This is all I did at the top and bottom to finish those edges. For the argyle fabric I could cut without any fraying.
Try stretching the ends of the scarf to see if they are finished, they probably are if the scarf is knit. The way they are finished may make them too tight when folded in half, around the upper leg, so it is best to cut the ends of the scarf off in this case and re-sew a zigzagged line across the bottom and top of your two pieces, stretching a bit as you sew. If you have a serger, use it. I had my instructor serge the second pair of rainbow leggings so I could see if there was a difference in quality. I think hers are more durable but my sewing machine and zigzag stitch did fine. The only thing I can say about sewing such a "hairy" fabric is to keep a seem ripper handy for when you get stuck. You will never notice where you have used it in the end. I had smooth sailing with the argyle pair.
Piece with finished ends folded in half and ready to stitch up the side.
Step Two
Now that you have your pieces, you are ready to fold them in half, right sides together, and to zigzag stitch up the side. My knit scarf didn't have a right and wrong side.
Stitched
Step Three
Turn your fabric tube right side out. I am finished with the rainbow pair at this point. I need to stitch the top and bottom edges of the argyle pair. I folded the fabric, which stayed without pinning, in about a half inch, and zigzag stitched around, near the edge. They are now complete and can be worn as arm warmers or leggings (see photos below).
Finished top edge.
The same arm warmers as above, now on my daughter...
Embellish
Some Possible Materials
You can embellish these leggings/warmers whatever way you chose. The sky is the limit. I decided to use vintage buttons, embroidery thread, ribbon.
Threading the ribbon from the "wrong" side out...
Because the rainbow leggings have such a loose knit I was able to thread the ribbon through them easily. I started in the middle of the front of each one (turning them so the seem would be inside the leg) and threaded from the inside to the outside, so there would be enough ribbon on the inside so that I could sew the button to it from the outside.
The "right" side of the legging with the ribbon coming out from the inside.
Front
Next I sewed the button onto the "hidden" part of the ribbon, using embroidery thread. In my mind, this is the front of the legging but of course could be the back...
Back
I continued to thread the ribbon in and out of the legging until I got to the middle part of the back. I then brought the two sides of the ribbon out the same hole and tied it in a bow. Voila!
If you have any questions or comments about this project please leave them here. I would love to know if I have inspired you to try this and to see your leggings on your blog. I will now leave you with a few more images of the leggings in action...
Labels:
babies,
gifts you can make,
green gifts,
how-to,
sewing,
thrifted,
tutorial,
upcycled,
Victory Thrift
Wednesday, January 20, 2010
Part Two Baltic Amber Teething Necklace- How to Make One For Your Baby
I decided to make my daughter her amber teething necklace, which I first wrote about in post "Part One". If you don't want to make your own necklace there are several places you can buy one online. If you go to Etsy.com and search on "amber teething" many sellers pop up. If you would like to make one please follow the simple tutorial below. I bought my beads online from Amberizon. My beads came from Latvia and are good quality. It is possible to get fake glass beads if you don't have a reputable source. Amberizon has many kinds of beads to choose from as well as necklaces that are already made. I ordered raw baltic amber beads as these are said to have the strongest calming properties. The one ounce package contained enough to make one 12.5 inch necklace, with some left over beads to add to the length of the necklace as my daughter grows. The quality is great, the various colorings of the beads are beautiful, and the holes are quite uniform.
PLEASE NOTE: I ordered 1513, which from the photo looks like rusty rocks, but what I received are the beads you see in this tutorial. They do have a frosted unpolished look, but they vary in color and don't look like the photo on the Amberizon site...
How To Make an Amber Teething Necklace Tutorial
What you need:
1 oz of Baltic amber beads
1 magnetic barrel clasp
beading thread of your choice (I made this necklace twice before I opted for six strand embroidery thread because it is strong and makes good sized knots. Other people use silk thread or hemp)
beading needle
elmer's glue
Step One
Tie one end of your thread around the end of one part of your barrel clasp. Tie several secure knots. Glue the knots. I didn't glue the knots the first two times I made this necklace and both times the knots came undone at the clasp. When this happens, you have to retie the whole necklace because the thread is too short to just retie it to the clasp. Tres frustrating! If you know anything about crimp beads, as seen in this photo, you can use one, but in the end, I didn't.
Step Two
Slide a bead onto your needle, then down securely to the knots at the clasp, and knot behind the bead, then repeat until you have a necklace that is the length you want. Knotting after each bead serves two purposes; if the necklace breaks your beads will not fly all over the place and your child is less likely to choke on a bead.
The best way to get a tight knot, right against your bead, is to make your knot, then slide you needle halfway into the knot (see photo above), then pull the loose thread coming up from the knot tightly down against the needle against the bead (see photo below). Slide your needle out as you continue to tighten. You want your knot to sit firmly next to your bead but not pull into the bead. For more on basic beading using knots see this video.
Step Three
Repeat step two until you get to the length you want. Now you can tie on the other end of the barrel clasp securely to the end of the necklace and glue the knots. Once it has dried, put your necklace on your baby and admire it.
To Care For Your Necklace
Some people leave their child's necklace on all the time but I take my baby's off when I bathe her. Do not wash your necklace with soap, which will leave a residue, hindering the healing properties of the necklace.
Labels:
gifts you can make,
handmade gifts,
how-to,
natural health,
new baby,
tutorial
Tuesday, December 22, 2009
Hallelujah for the Christmas Cookie Exchange
Who came up with this holiday ritual? I want to thank them from the bottom of my heart. The Christmas cookie exchange is truly the lazy woman's answer for having tins of goodies of all variety over the holidays. I love the concept. And, after having heard of these wondrous events, I can now say I have taken part. And I am hooked!
Ok, I just had to look it up. While the Christmas Cookie Exchange is not credited to one person, it seems to first have appeared in print in the 1963 Betty Crocker's Cooky Book.
"A Party Idea. A popular once-a-year party is the Chrismas cooky swap party. Friends and neighbors gather, each bringing one dozen of her holiday specialty for each woman at the party. Cookies are set out to sample and admire and coffee is served. Afterward each one takes home a wonderful variety of festive cookies." Thank you, foodtimeline.org.
On a side note, did you know that my father's mother was the first female executive at General Mills, and for awhile, she was some of the features on the face of Betty Crocker (who was a composite of several women)? More on that someday...
Back to cookies... on Saturday night, I was part of a cookie exchange. It was just up the road from my house, and I was able to go with a good friend, while her hubby watched our three 1/2 year old daughters, who were incidentally born on the same day. Michelle & I got to hang out with my babe and two other fine ladies, sipping wine, eating Mexican chili (even veggie style for me!), and chatting. In the end, my 4 kinds of treats, turned into 9! And now, I have beautiful tins of baked goods to give away as gifts and to eat. Yum, yum!
I hope to collect some of the other recipes, which included yummy Russian Tea Cakes, delicious oatmeal peanut butter cranberry cookies, and exquisite pistachio lime iced cookies. I can share what I made...
Peanut Blossoms, which I wrote about and posted the recipe for here. My Aunt Jackie used to make these during the holidays and I think of her every time I make them. She taught me how and I used to unwrap and push in the Hershey's Kisses.
Maple Cinnamon Pecans. I got this recipe from my favorite enewsletter, Craft Daily. They are easy to make and the host of the cookie exchange referred to them as "crack", so be prepared to be addicted.
Homemade Chocolate Dipped Marshmallows. The recipe is here. Once again, Craft Daily, and the same wonderful contributor. The cookie exchange host squealed when she saw these! I could not resist attempting these. I don't really like to just eat marshmallows but I thought they would make great gifts next year, along with cocoa mix. I wanted to give them a shot before planning to make bunches and bunches. It was quite easy albeit sticky. I think I got about 5 dozen out of this recipe. I would use more vanilla bean next time and a stand mixer... They are beautiful, delicious, and Quin has fun helping to put the crushed candy cane on. They need to be refrigerated and can be kept for up to one week.
Iced Sugar Cookies. I have to admit that the batter for these was not made my me. The horror... but I wanted to support a friend who was selling buckets of frozen cookie dough as a fundraiser for her son's school. I bought one, thinking how much fun Quin and I would have making them. And we did. And I have a great respect for people who do such a beautiful job of decorating these. The thought of making different colored frosting... eeck. I just made a simple icing from icing sugar, a few drops of water, and a couple drops of lemon juice. Add sprinkles et voila!
Labels:
baby food,
baking,
gifts you can make,
holidays,
recipe
Sunday, December 6, 2009
The Best Little Sweater Ever There Was... it Zips Up the BACK!
My friend Dominique has a lovely grandmother, Rachel, whom I got to know because I would occasionally taught crafts at the senior center she spends time at. I miss those seniors. Due to budget cuts, I have not seen them this year... anyway, for quite sometime I have been coveting the sweaters that Rachel has made for Dom's kids, as well as many, many other new babes in the area. They are ingenious, brilliant, and completely unique to me. I come from Minneapolis, the land of cold, so I thought I had seen everything known to man when it comes to winter wear. These sweaters have a zipper IN THE BACK, so instead of trying to put them over the head of your infant, you can just slip their arms in the sleeves, zip them up, and away you go (or "Bob's your uncle" as they would say in Maine).
It is basically a reverse hoodie but so much cooler somehow. I wish I could knit. Not being afraid to try new things, I have tried. But, I never got past the point of having really loose and really tight stitches. I decided that I would leave knitting to the many talented friends that I have who do it so well and who kindly shower us regularly with hand knitted items. Leave it to the pros. Well, Rachel is a pro, a legend even. When Dom came over with several sweaters for me to chose from, and then quoted me an really generous price, I was ecstatic. I chose a beautiful brown, green, and blue one that looks adorable on Emmanuelle but would look good on a boy as well so I am sure it will make the rounds of all the family kiddos.
I wish I knew how to write about knits, it has some beautiful detailing I would explain if I knew the right words. I think the detailing down the middle front of the sweater is called cable lattice. And I LOVE the peaked, elfin style hood! I have not been able to hang it in the closet, I have just been admiring it hanging on the back of a dining room chair. So, anyway, wanted to write about out lovely new handmade sweater, and to maybe inspire those of you who knit to figure out how to make one as your next baby gift. If you do, or if you know more about this style of sweater, let me know... Here is a link to a free pattern as well as to a blog post that has great photos of this style of sweater.
Labels:
Canadian handmade,
fiber art,
gifts you can make,
handmade,
knitting,
new baby
Subscribe to:
Posts (Atom)


