Showing posts with label upcycled. Show all posts

Monday, May 31, 2010

Recycled Art for Kids: Painted Rocks Project #2 - Rock Houses For the Garden


My sweet little houses...

Rain, rain... not that the grass and I are complaining, but it can be hard on the kiddos. Here is another painted rock project that came from the recycled art class I taught this month. These are great for kids of all ages to work on. They look awesome in a garden. And the possibilities are endless. Your child can make a whole neighborhood.

Painted Rock Houses

by Tiffany Teske


What You Will Need

~ Rocks
~ Acrylic craft paint
~ Paint brushes; one for covering the rocks with solid all-over color, and smaller ones for detail work
~ Clear glossy spray lacquer


Directions

1. Select your rocks. Wash and let them dry.
2. Paint your rocks a solid color (as in the photo above). You will need to paint them all on one side, let them dry, then flip them over to paint the other side. Acrylic paint dries quickly.
3. Repeat step number two, 2-3 times, depending on the color of paint and how well it covers. Dark colors cover better, faster, than light colors.
4. Paint your house on the rock, filling it in with color. Using a small detail brush, paint dots, strips, flowers, and any other kind of design on your rocks. I like to outline my details with black paint once all the colored paint has dried.
5. Let everything dry well. Overnight is good.
6. Spray with sealer according to manufacturer instructions. This it to make the rocks more durable so they can be out in the elements of the garden.
7. Place your rocks outdoors, preferably somewhere you can see them from inside.


One of my student's houses, I believe she is 9. Isn't it adorable?

Sunday, May 30, 2010

Recycled Art for Kids: Painted Rocks Project #1 - The Caterpillar


I just finished teaching a Recycled Art class series for kids aged almost 5 to 9. It can be challenging to select activities for that span of ages, but it can be done. One day we did two painting projects, both of which involved painting rocks. Kids LOVE to paint, probably because it is a messy activity that many moms don't want them to do (I am sometimes guilty of this myself). Kids also love rocks. My daughter likes to fill her pockets with them. And since we worked on this project she brings them to me all the time. It is fun because I put them in a coat pocket, or on the mantle, or in the car, and then I think of her and how she thinks of me, when I see them. I am happy she has started to see beyond the obvious uses for things. This project is a good project for all age levels and the kids can feel really good about and use their imaginations to play with the results.


How to Make a Painted Rock Caterpillar
by Tiffany Teske

What You Will Need

~ 5 or more rocks
~ Acrylic craft paint
~ Paint brushes; one for covering the rocks with solid all-over color, and smaller ones for detail work
~ Matte finish sealant; I used Krylon Matte Finish Spray Fixative


Directions
1. Select your rocks. Wash rocks and let them dry.
2. Paint your rocks a solid color. You will need to paint them all on one side, let them dry, then flip them over to paint the other side. Acrylic paint dries quickly.
3. Repeat step number two, 2-3 times, depending on the color of paint and how well it covers. Dark colors cover better, faster, than light colors.
4. Using a small detail brush, paint dots, strips, and any other kind of design on your rocks. Also, make a face on your first rock, and maybe little legs and feet on the sides of the other rocks. The sky is the limit.
5. Let everything dry well. I waited until the next day.
6. Spray with sealer according to manufacturer instructions. This it to make the rocks more durable.
7. Play with your new caterpillar.

Monday, March 29, 2010

Recycled Glass Inukshuk


The world became acquainted with the inukshuk during the 2010 Winter Olympics. It is a stone landmark or cairn built by humans to mark a place such as a trail head, hunting ground, or a food cache. The word inukshuk means "something which acts for or performs the function of a person." Many people confuse inukshuk, which can be just one stone, with inunnguaq, which is several stones places to look like a human figure. It seems that inukshuk is now used interchangeably for either type of marker.


My friend Tawna recently came to Banff, and brought me a gift from her native Yellowknife, Northwest Territories. I asked for something small I could add to my extensive collection of art and handmade goods. Tawna not only brought me something from Yellowknife but something HER MOM made! Rita Brown takes broken glass from the Yellowknife "dump" and recycles and upcycles it into beautiful inukshuks of varying sizes. If you are interested in knowing more please leave me a comment and I can contact you with Rita's email address.

On a side note, we are planning a trip to visit Tawna this summer. I can't wait! We have never been to the Northwest Territories and Yellowknife is the capital. It is always a treat to be shown around a place by natives, and Tawna is known for letting people know about her city wherever she goes. She hands out information from the tourism board on a regular basis. They really should put her on commission... I will be sure to share our trip here so stay tuned.

Friday, March 19, 2010

Tutorial - Camera Strap Cover - Revamp an Old Camera Strap Using Thrifted Upholstery Samples and Embroidery


You may or may not know that I hold two University degrees in photography (one as the major and the other as a minor to studio art). I am an artist, crafter, writer, and all around creative, but I usually say I am a photographer first when I am asked what I "do". Six months after I had my first child we moved across the country for my husband's job and I pretty much gave up my commercial photography business. I specialized in shooting black and white film images at the homes of my clients. I shot enough sessions that I would burn out motors and shutters so I would buy "new" used bodies for back ups. Last month, I started going through all of my analog camera equipment. I have 7 SLR bodies, from good working order to parts cameras, that I needed to test. I have gotten through 5 of them, with some of the results here. I love and miss shooting film and now that I know which cameras to keep, I will probably be doing more of it...

This brings me to the project. In the course of going through all my gear, I decided it was time to make my camera straps pretty. My recent sewing class has inspired me to find new sewing projects and a wide, boring, black neoprene camera strap volunteered to undergo a make over. This project can be adapted to your vision. The sky is really the limit on fabric and embellishments. You can even hand sew this project entirely if you don't have a sewing machine. If you don't have a camera strap you can find many boring and suitable candidates at the thrift store. I will walk you through a few simple steps and then off you go...

How-to Cover a Boring Camera Strap to Make it Pretty...

What you need...

- Wide camera strap
- Fabric, I used upholstery samples
- Sewing Machine and thread (or needle & thread to hand sew)
- Items for embellishment like buttons & embroidery thread


1) Using your camera strap to measure against, decide where to cut your fabric. My piece had some grommets I cut off. Here you can see I pinned the fabric up against the edge of the strap. You will need to make a tube around your strap that fits snugly. I think I only had about 1/2" of fabric beyond my strap on each side (so cut fabric 1" wider than strap).


2) If the ends of your fabric are not finished, finish them now. My sample had finished ends which I just turned under when I put my cover on. It was too short, however, to be used as one piece, so I did sew two pieces if it together. I didn't bother to line up the pattern because I knew I would embellish one end... I sewed the buttons where my obvious seam from joining the two pieces is.


3) You can embellish the top front side of your fabric (the part you will be able to see) now or at the end. I actually did all of my embellishing at the end, when my cover was already on, using a curved tapestry needle. I would suggest doing the embellishing before if you want to remove the strap (since I may have sewn through parts of the strap). I just embellished one end. I did it on the end because I knew that part would show while wearing my camera. If your hair is short you could embellish the whole strap, since it won't be hidden under your hair. I cut a flower and paisley from my fabric and appliqued them on, using embroidery thread.


4) Put wrong sides of fabric together, pin, and sew, using a straight stitch, reinforcing each end by front and back stitching. I used a 1/4" seam allowance. Turn your tube right side out.


5) Slide your cover onto your strap. If you already embellished, you are now done, If not, go ahead and do it now.


Voila! Now go, shoot something, and wear your camera with pride...

Sunday, March 14, 2010

Tutorial - How To Make Baby and Child Leg Warmers, and Adult or Child Arm Warmers With Thrifted Scarves

Warning: Lots of cute photos of kiddos to come... all images by Tiffany Teske


Baby Leggings


Child Arm Warmers


Baby Leggings & Child Arm Warmers


Adult Arm Warmers


Child Leg Warmers

I have had the idea to make these for several months now. I have been taking a sewing class, one of several I have taken over the years, and my favorite part about it is that I am given THREE UNINTERRUPTED HOURS to work on whatever I want. That is about how long it took me to make two pairs of baby leggings, for my babe and for a gift, and a pair of leg warmers for my daughter, who is almost 4 years old.


Front of Child Leg Warmers

I love to work with thrifted materials. Some are given to me and others I seek out at the thrift store, yard sales, and rummage sales. There are so many possible places to find fabrics that I rarely buy new fabric. I always keep an eye out for materials that I can use in the future, especially vintage prints. This allows me to amass a stash so that when I have time to work on something I just go "shopping" in my studio and I usually find what I am looking for. I also stockpile materials for when I teach recycled art and craft classes to adults and children.


Back of Child Leg Warmers + Cute Baby

The two scarves I used for these projects came from Victory Thrift Store. They normally sell scarves for $2 each but they often have a buy one, get one for 99% off sale. It cost me $2.03 for these scarves. They are very different from one another. Since I had never made these I didn't really know what to expect when sewing the scarves. I looked for stretchy scarves but all scarves are different. I spent a long time touching, stretching, and anticipating. The important factor is that they stretch out and then back into shape. They need to stretch enough to go onto the baby or child's leg and then to stay there. As mentioned in the title, if they are long enough these can also be used a adult arm warmers with no modifications.

How To Make Baby Legs, Child Leg Warmers, and Adult Arm Warmers With a Thrifted Scarf

This is a simple project for even a beginner. The only trick is selecting the right scarf. Read through all of the instructions for tips on this and rest assured this is an easy project that will leave you feeling accomplished in the end.

What you will need:
- a stretchy scarf
- a sewing machine (or Serger if you have one, I don't)
- coordinating thread
- needle for stretch fabrics
- pins
Optional items for embellishment such as vintage buttons, embroidery thread, ribbon...


One of my two scarves before I started cutting...


Now with the ends cut off and cut in half.


Zigzag stitch at the bottom and top of one legging. I didn't fold this edge over and stitch since this material wouldn't hold like that. I just stitched around near the top.

Step One
Decide on the length you want the leggings to be and then decide how to cut your scarf. It will completely depend on your scarf and your needs. You will need about a 1/4" seam allowance on each end. For my fuzzy rainbow leggings I was able to get two pair from the one scarf, meaning I cut four pieces from the full length and I used the full width. For my argyle ones I cut the scarf in half for one pair and I guesstimated on how tight I wanted them. I did end up cutting a bit of the width off, so I used 3/4 of the width. Where and how you cut will depend on the fabric. For the stretchy fuzzy scarf I needed to sew a line, using zigzag stitch at each end of a piece BEFORE I did any cutting because the knit fabric unraveled once cut. This is all I did at the top and bottom to finish those edges. For the argyle fabric I could cut without any fraying.

Try stretching the ends of the scarf to see if they are finished, they probably are if the scarf is knit. The way they are finished may make them too tight when folded in half, around the upper leg, so it is best to cut the ends of the scarf off in this case and re-sew a zigzagged line across the bottom and top of your two pieces, stretching a bit as you sew. If you have a serger, use it. I had my instructor serge the second pair of rainbow leggings so I could see if there was a difference in quality. I think hers are more durable but my sewing machine and zigzag stitch did fine. The only thing I can say about sewing such a "hairy" fabric is to keep a seem ripper handy for when you get stuck. You will never notice where you have used it in the end. I had smooth sailing with the argyle pair.


Piece with finished ends folded in half and ready to stitch up the side.

Step Two
Now that you have your pieces, you are ready to fold them in half, right sides together, and to zigzag stitch up the side. My knit scarf didn't have a right and wrong side.


Stitched

Step Three
Turn your fabric tube right side out. I am finished with the rainbow pair at this point. I need to stitch the top and bottom edges of the argyle pair. I folded the fabric, which stayed without pinning, in about a half inch, and zigzag stitched around, near the edge. They are now complete and can be worn as arm warmers or leggings (see photos below).


Finished top edge.


The same arm warmers as above, now on my daughter...


Embellish


Some Possible Materials

You can embellish these leggings/warmers whatever way you chose. The sky is the limit. I decided to use vintage buttons, embroidery thread, ribbon.


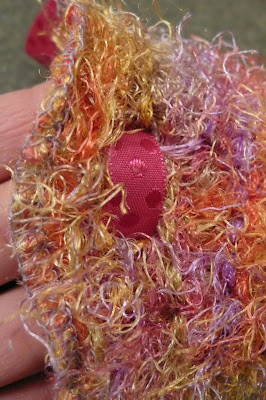
Threading the ribbon from the "wrong" side out...

Because the rainbow leggings have such a loose knit I was able to thread the ribbon through them easily. I started in the middle of the front of each one (turning them so the seem would be inside the leg) and threaded from the inside to the outside, so there would be enough ribbon on the inside so that I could sew the button to it from the outside.


The "right" side of the legging with the ribbon coming out from the inside.


Front

Next I sewed the button onto the "hidden" part of the ribbon, using embroidery thread. In my mind, this is the front of the legging but of course could be the back...


Back

I continued to thread the ribbon in and out of the legging until I got to the middle part of the back. I then brought the two sides of the ribbon out the same hole and tied it in a bow. Voila!

If you have any questions or comments about this project please leave them here. I would love to know if I have inspired you to try this and to see your leggings on your blog. I will now leave you with a few more images of the leggings in action...


Wednesday, February 3, 2010

February 3rd - Spray Paint, Rick Rack, & Smoked Salmon


Today, between swimming lessons for my three year old and Baby Time at the local library for my 8 month old, I was able to fit in some creative moments...

#1 I spray painted sconces and a frame that I like but didn't like the colors of. Spray painting doesn't take much creativity but it does quickly upcycle something that may otherwise be throw away (although it is not the greenest way to go about keeping something out of a landfill...) I wasn't sure how I would feel about the gold but it is pretty and shiny and will look great on the wall where I plan to hang them. I bought these for $1 each at a thrift store. I have had the frame forever, but never liked the green. I thought this paint would be more of a cream... I was going to paint it completely but decided I like bit of the green showing through. So there, I did have to use a bit of creative decision making  in this process.

Posted via email from thing-a-day 2010

#2 I needed to get some muslin for a sewing project and decided to go a bit crazy buying trim for another project I have in mind (mixed media not sewing). I LOVE rick rack and I LOVE the local fabric store called Sugar Pine, that has EVERYTHING a creative needleworker could ever need!


#3 I made dinner. I make 2-3 meals a week that I have never made before. My whole family likes to eat and we are willing to try most anything (although the only "meat" I eat is fish). I get several food related e-newsletters so I am never lost for inspiration (there is also the local library and my massive cookbook collection). This one is from Martha. It is basically a salmon bagel sandwich turned into a pasta dish. Everyone including my three year old LOVED this. So easy, so tasty!
 
Farfalle with Smoked Salmon and Cream Cheese
By Martha Stewart

Ingredients

Serves 4

  • 12 ounces farfalle (bow-tie pasta) I used fusille...
  • Coarse salt and ground pepper
  • 1 small red onion, quartered and thinly sliced
  • 2 ounces bar cream cheese, cut into small pieces
  • 1/4 cup fresh dill, coarsely chopped, or 1 teaspoon dried dill weed
  • 2 tablespoons capers, drained and rinsed
  • 4 ounces smoked salmon, cut into bite-size pieces

Directions

  1. Cook pasta in a large pot of boiling salted water until al dente, according to package instructions. Reserve 1/2 cup pasta water. Add onion to pot; immediately drain pasta mixture, and return to pot.
  2. Add cream cheese, dill, capers, and salmon to pasta. Toss, adding reserved pasta water a little at a time to create a thin sauce that coats farfalle (you may not need all the water). Season lightly with salt and pepper. Serve.

All photos by Tiffany Teske
Please visit my blog, Art Food & Motherhood at http://tiffanyteske.blogspot.com

Tuesday, February 2, 2010

February 2nd - Upcycled Earrings & Community Garden Meeting

I have been looking at these earrings for a long time, thinking that I would never wear them again because they are just too silver and big and don't look good on me... but their blank canvas-like quality made me keep them around. For today. Today, I finally took apart the earrings, grabbed some chiyogami paper, traced the smaller earring piece onto it, then used matte gel medium to secure it, put them back together, and smiled...

On top of that, my 8 month old and I attended out first committee meeting for a proposed community garden in our lovely town of Banff. It was an energizing meeting, with many possibilities for gardening in our mountain town in the near future. A great group of people AND the meeting was so efficient that we finished early!

Posted via email from tiffanyteske's posterous